July 9, 2025
How to Install a Receipt Printer on Windows, Mac, and Linux (Raw Method)
This tutorial works with any receipt printer (literally any) and any computer.
Step 1: Choose the operating system you’re using
Most likely, you’re using Windows. But you might have a Mac or be running Linux.
Click the operating system you’re using:
Install the Receipt Printer on Windows
If you’d rather watch a video instead of reading, here’s a step-by-step guide you can follow:
Step 1: Download and Install QZ
You’ll need to download and install QZ.
In case you’re wondering, QZ is the program that takes care of sending the receipt directly to your receipt printer.
Download QZ for Windows Now
Step 2: Install the Receipt Printer on Your System
Trust me—I’ve installed hundreds of receipt printers from all kinds of brands. If you follow my steps, everything will go smoothly.
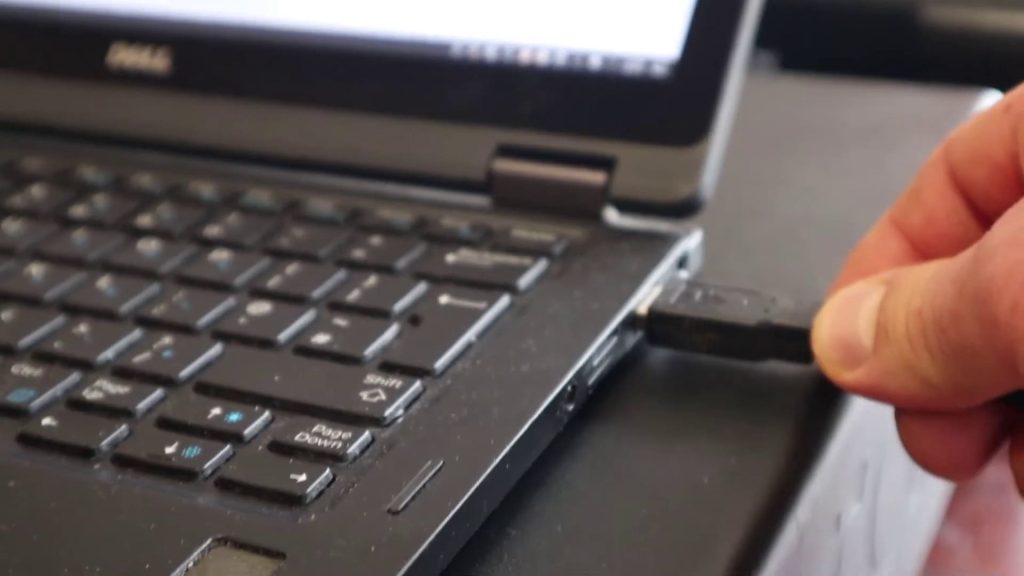
To get started, make sure your receipt printer is turned on and connected to your computer via USB.
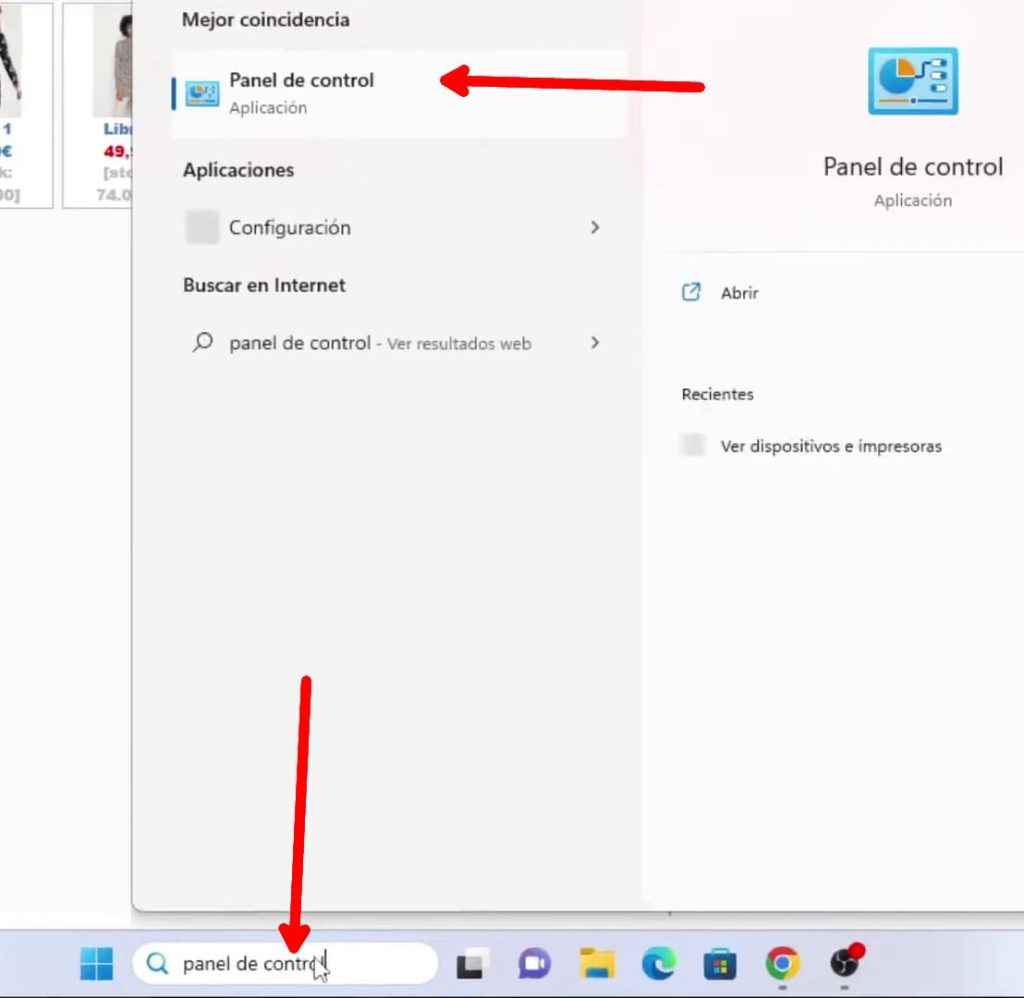
Now click the Windows Start button and type “Control Panel”. Click on Control Panel.
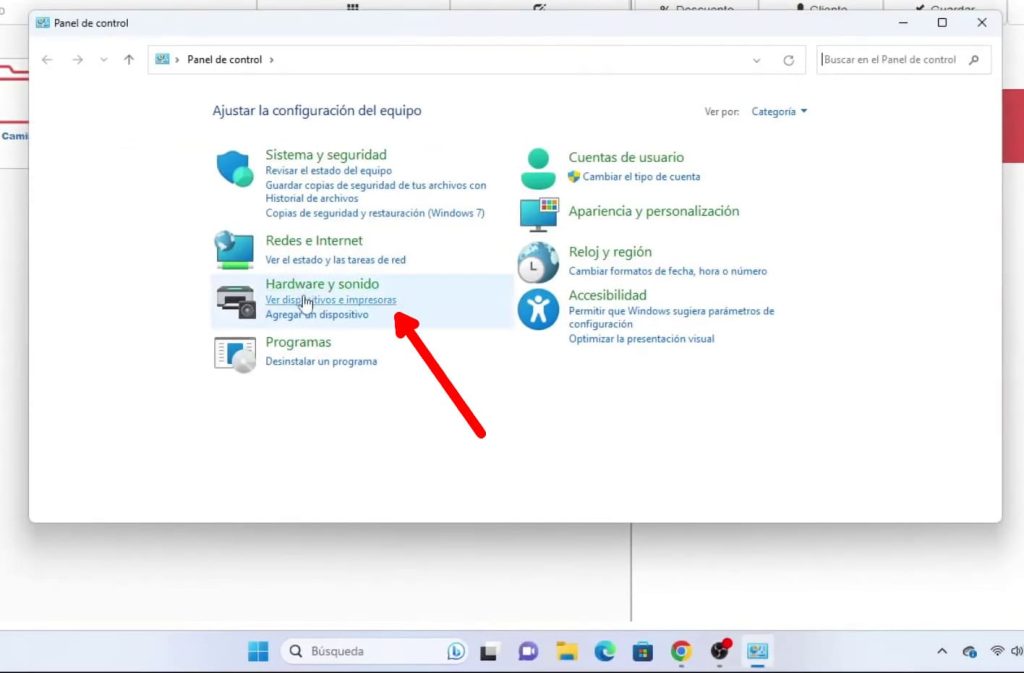
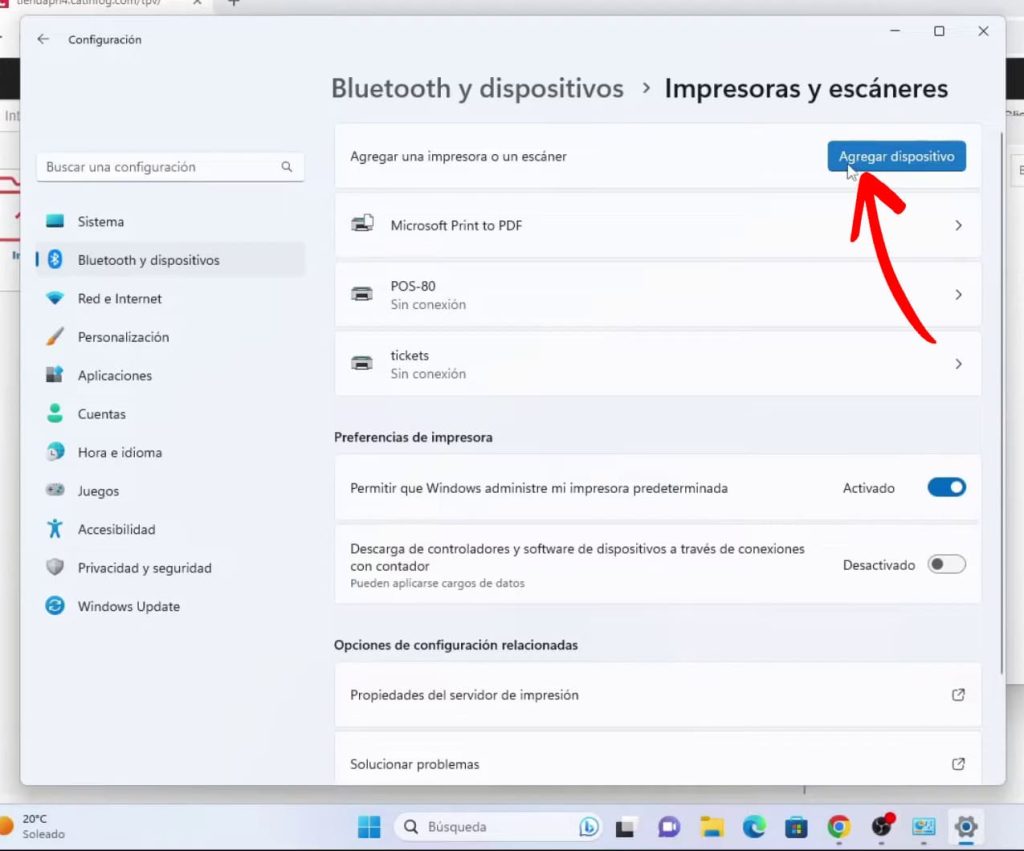
Click on “View devices and printers”.
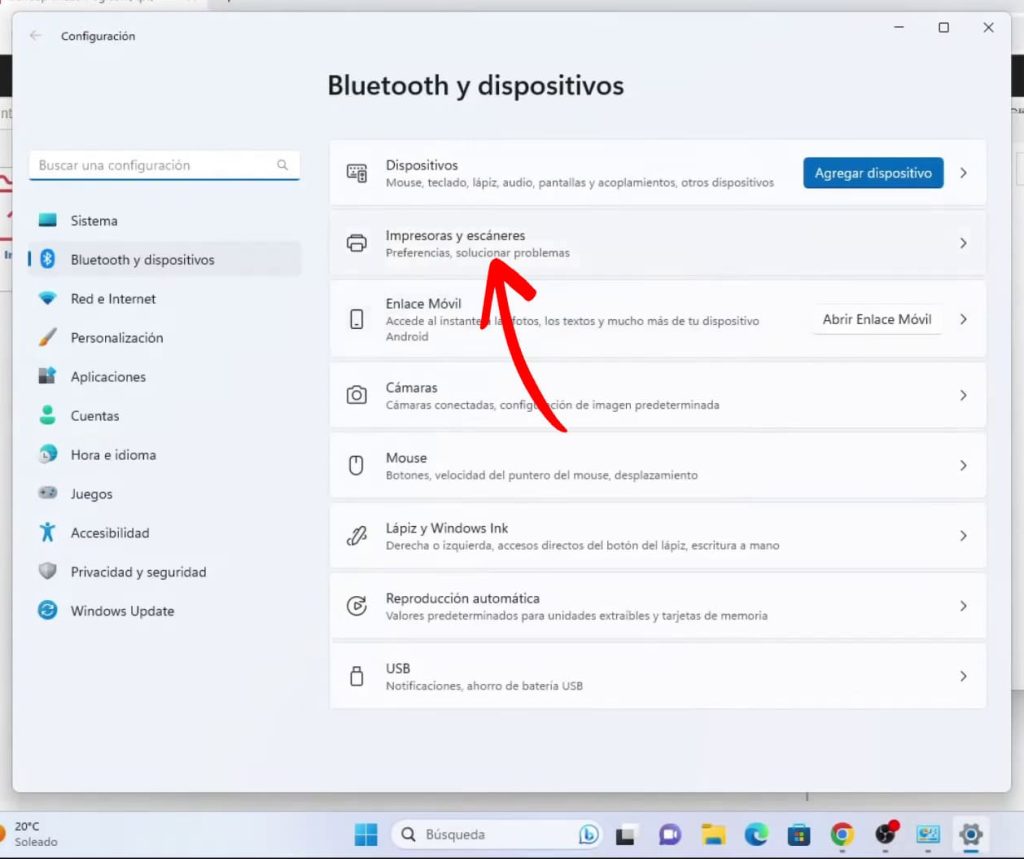
Click on “Printers & Scanners”.
Click on “Add device” and wait for the option “Add manually” to appear.
Click on “Add manually”.
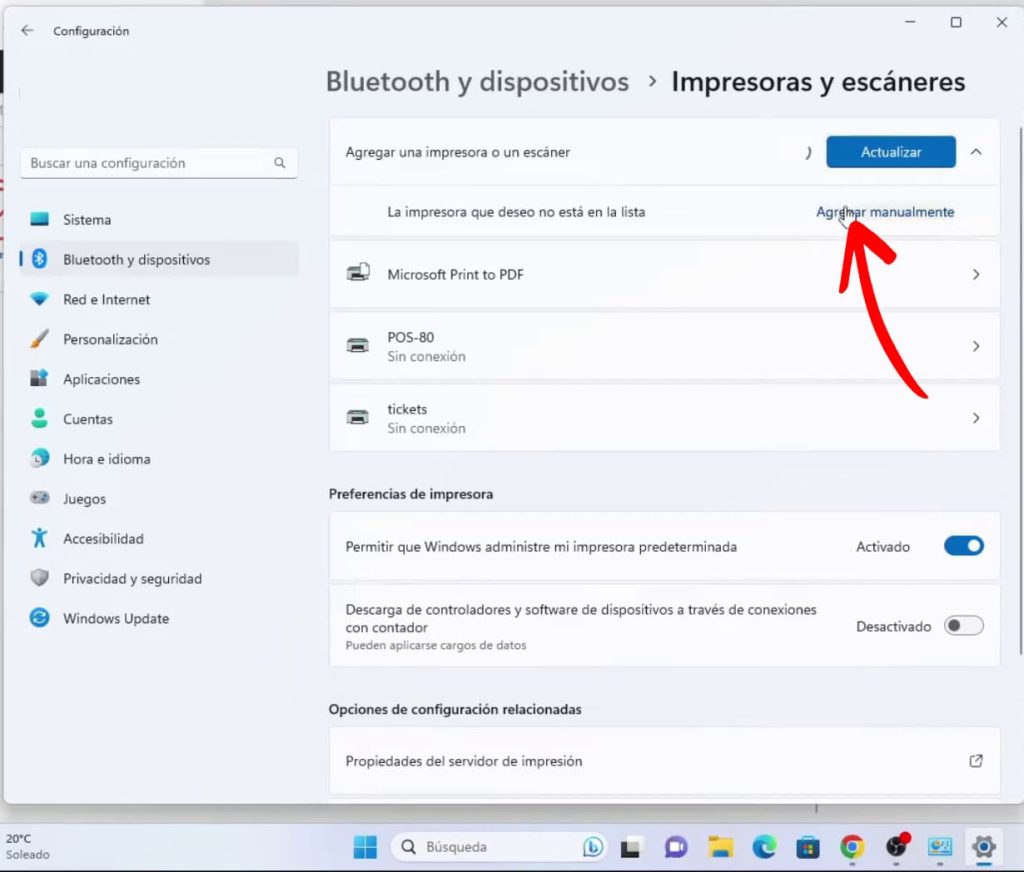
Select “Add a local printer or network printer with manual settings” and click Next.
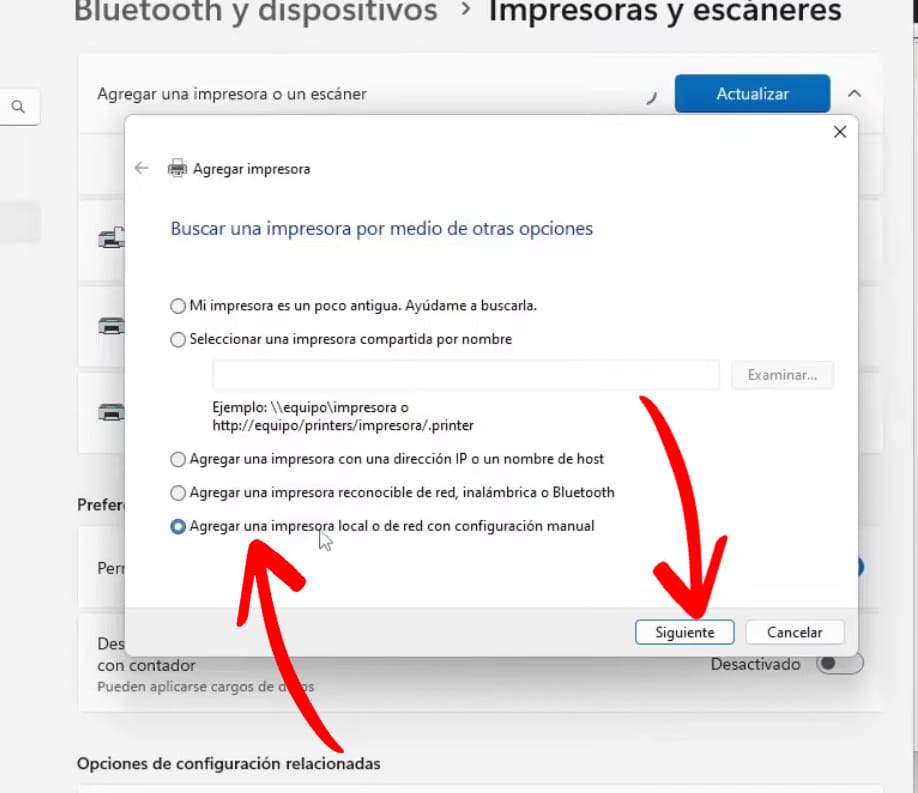
Select “Use an existing port” and choose a USB port, then click Next. You’ll recognize USB ports because they include “USB” in the name. If there are several, don’t worry—just choose any of them.
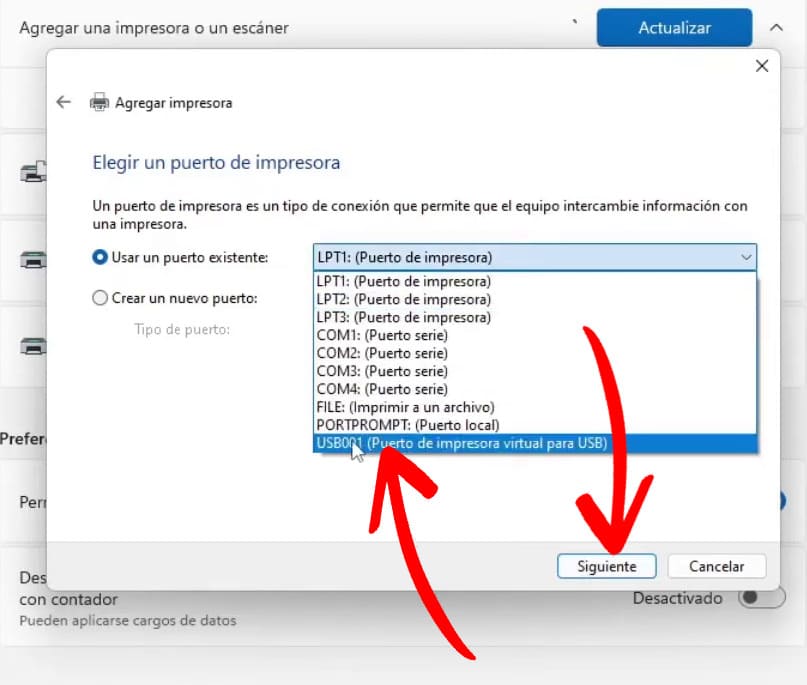
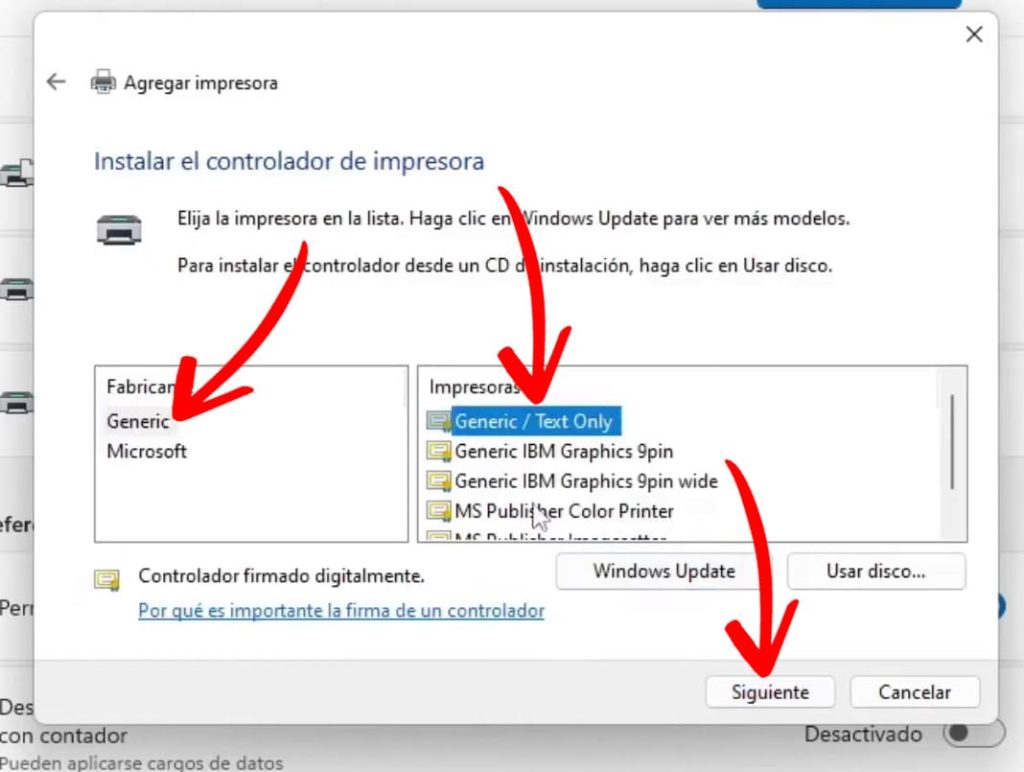
Now it’s time to choose the driver. On the left, click “Generic”, and on the right, select “Generic / Text Only”. Then click Next.
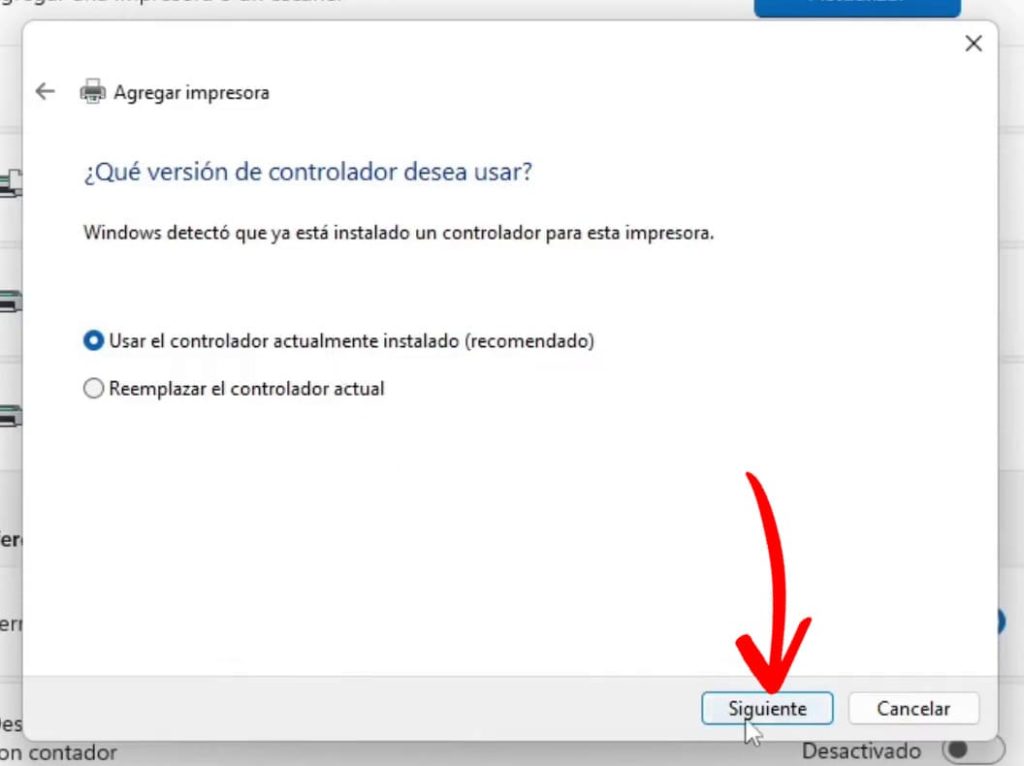
If you see the message “Which version of the driver do you want to use?”, no matter what it says—just click Next.
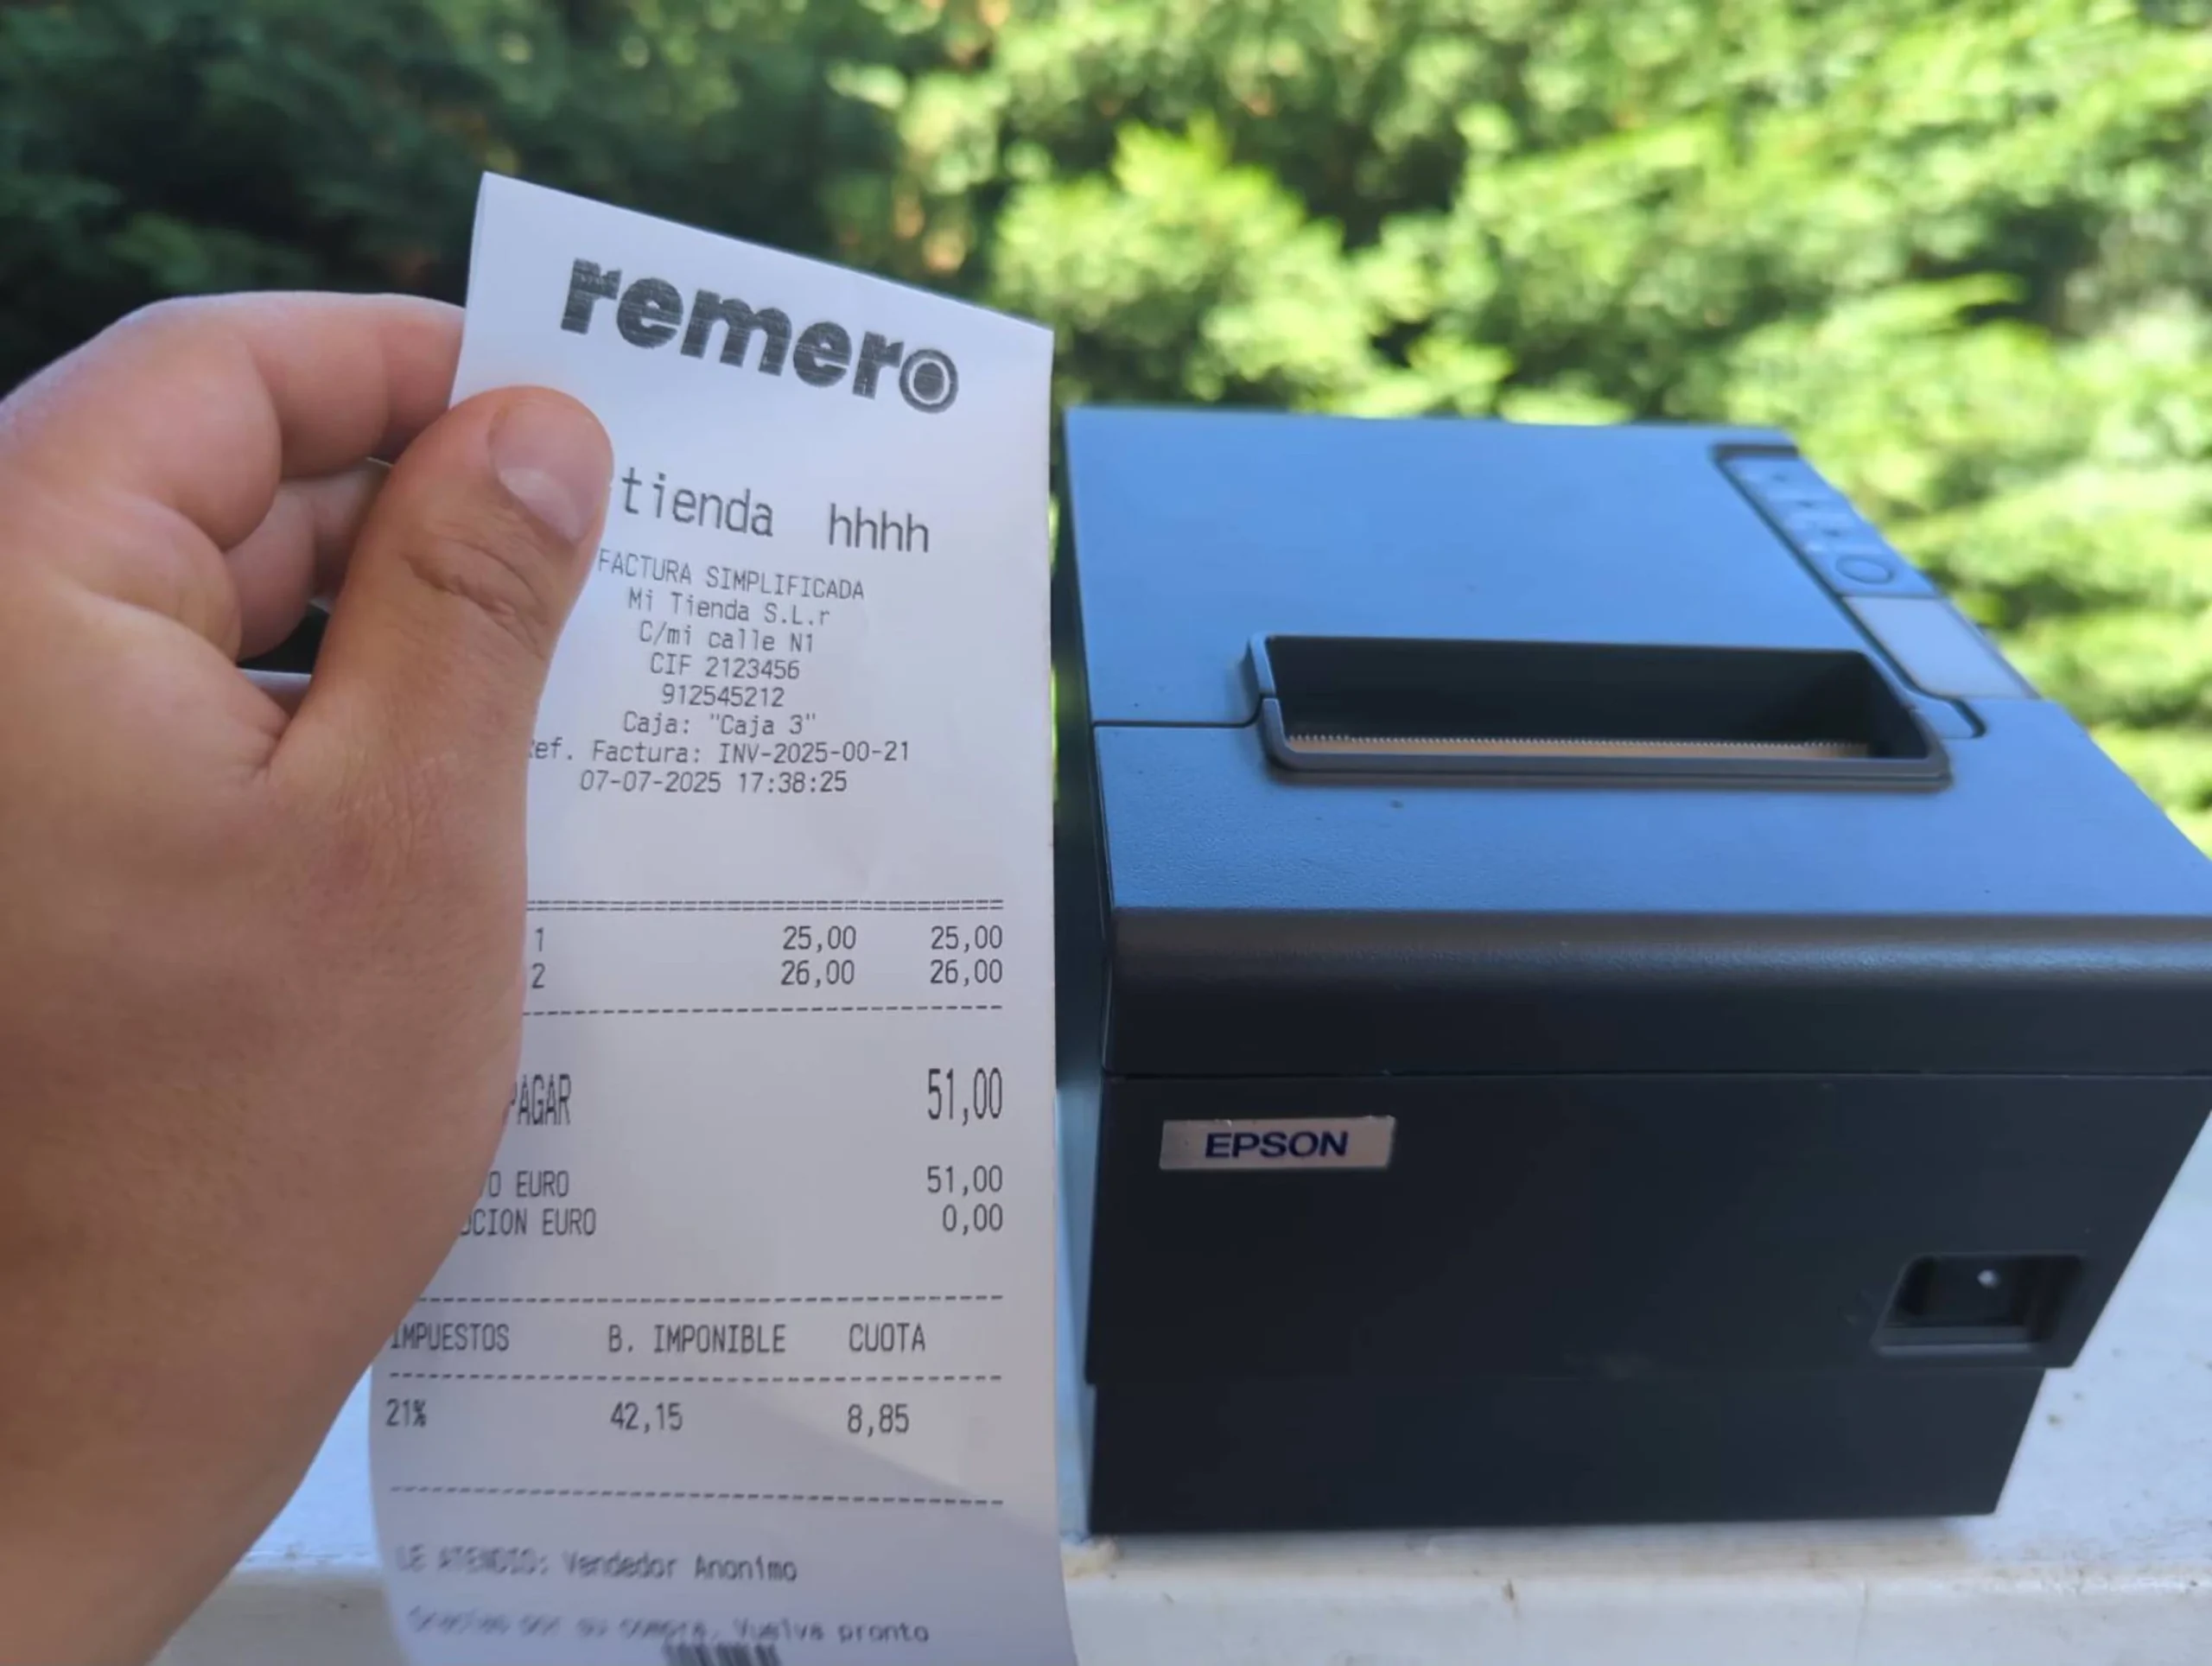
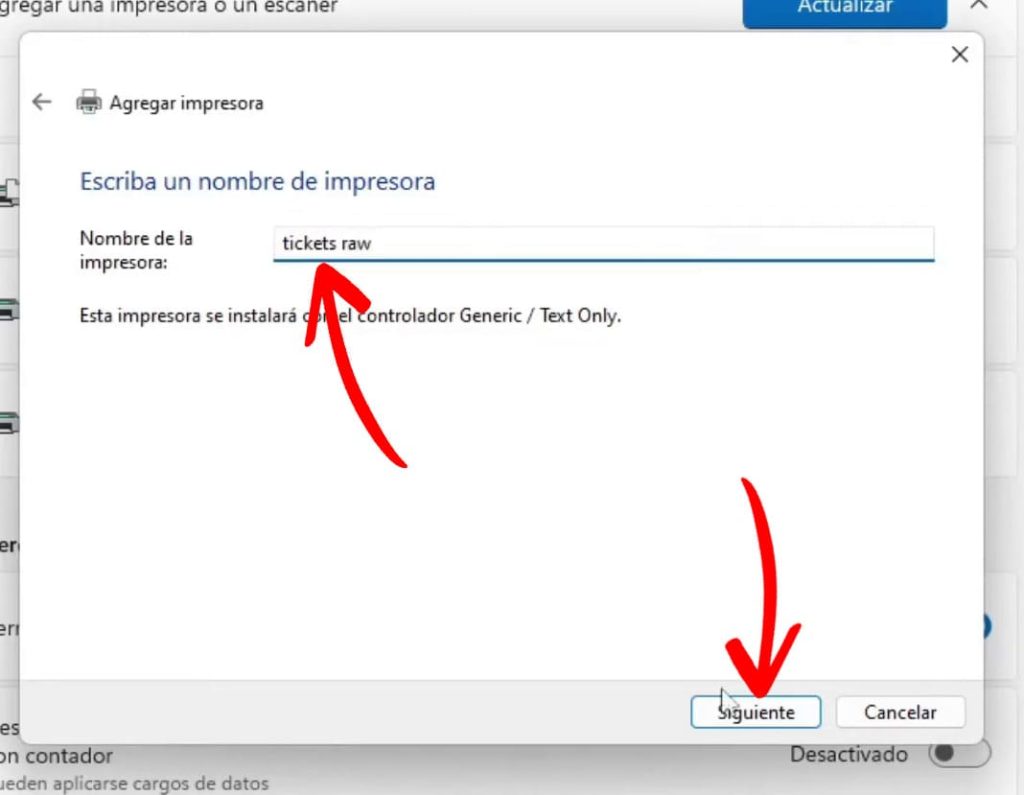
When it asks “Type a printer name”, enter a short and descriptive name. For example: tickets raw.
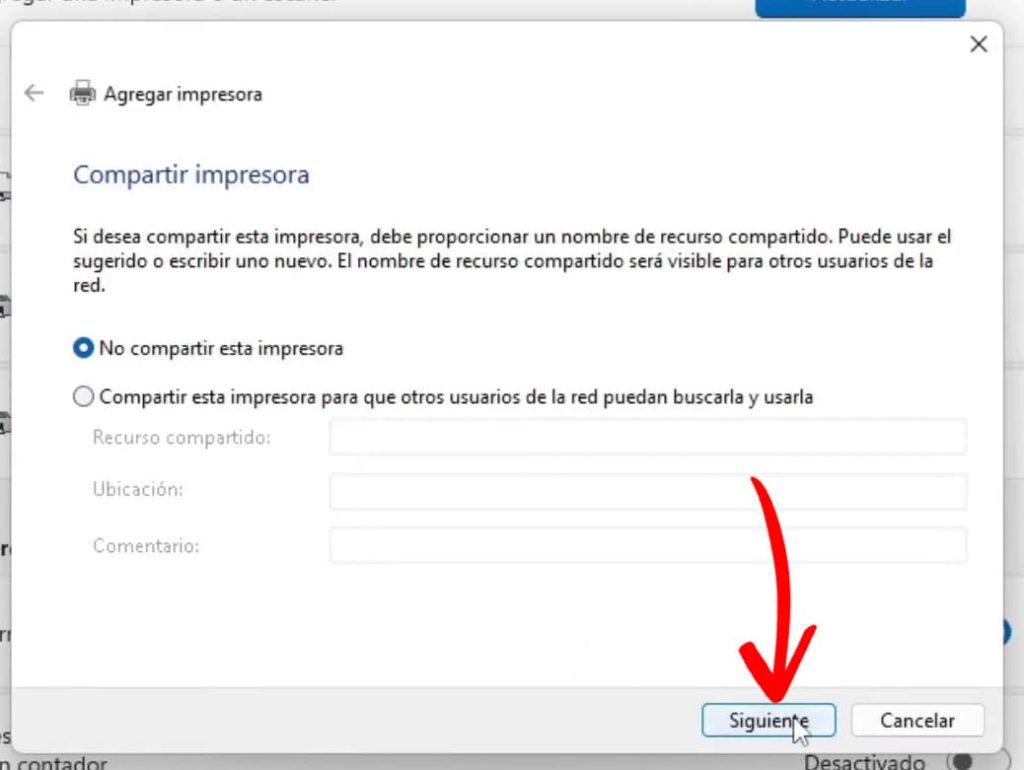
When asked about printer sharing, just click Next.
Click “Print a test page”.
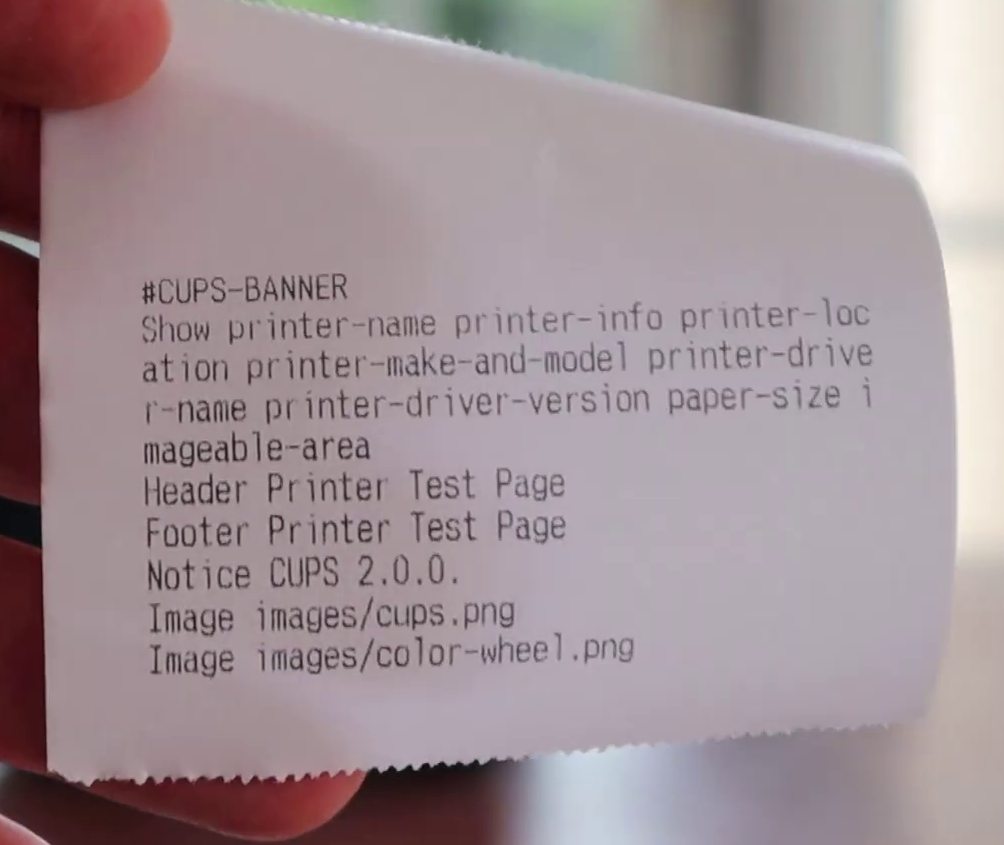
If the receipt prints successfully—congratulations! You’ve completed the installation and can now close all windows.
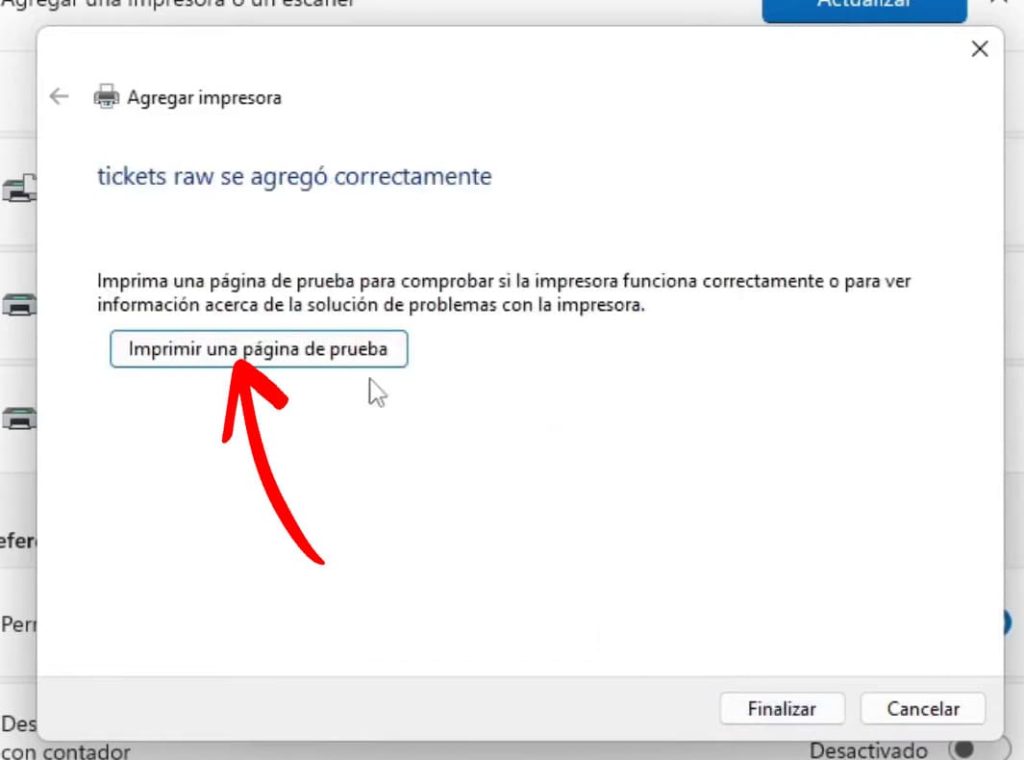
If you get a print error like the one shown and nothing prints, don’t worry—we’re almost there.
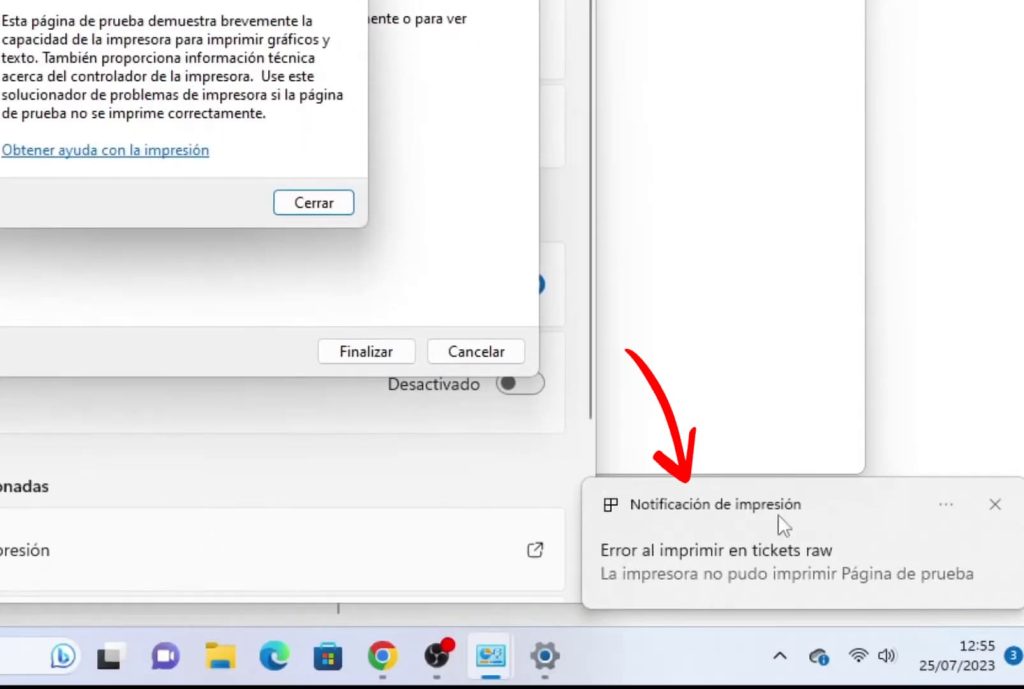
Go back to the “Printers & Scanners” window and click on the printer named Tickets raw.
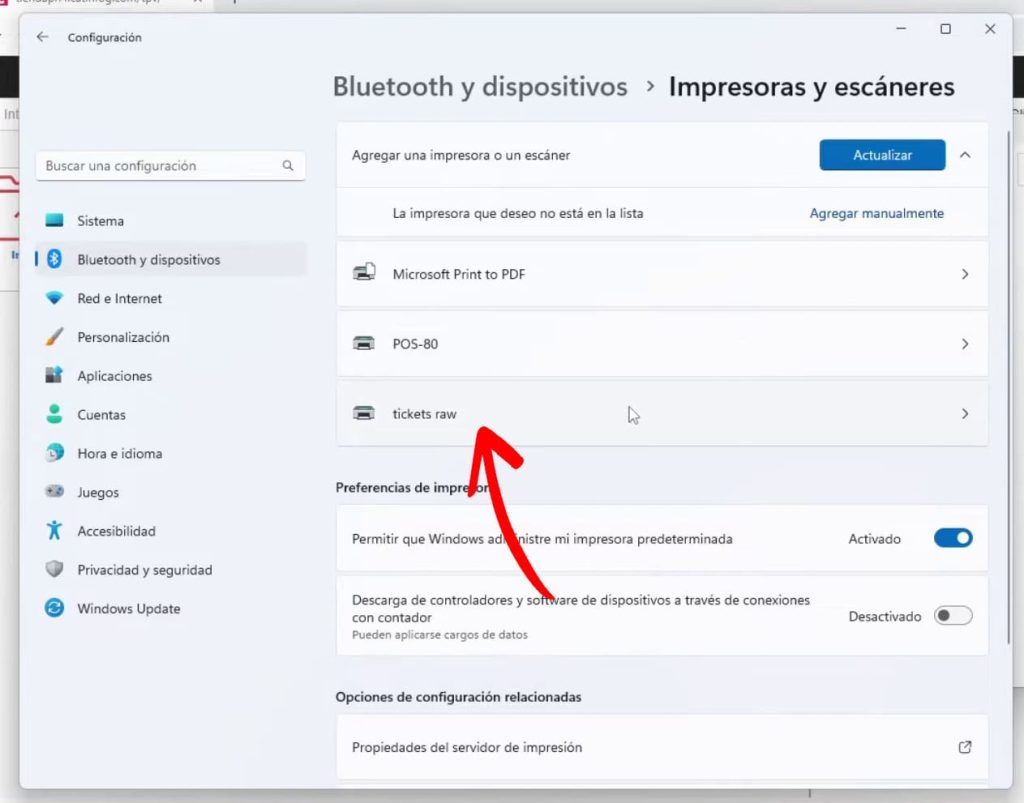
Click “Printer properties”.
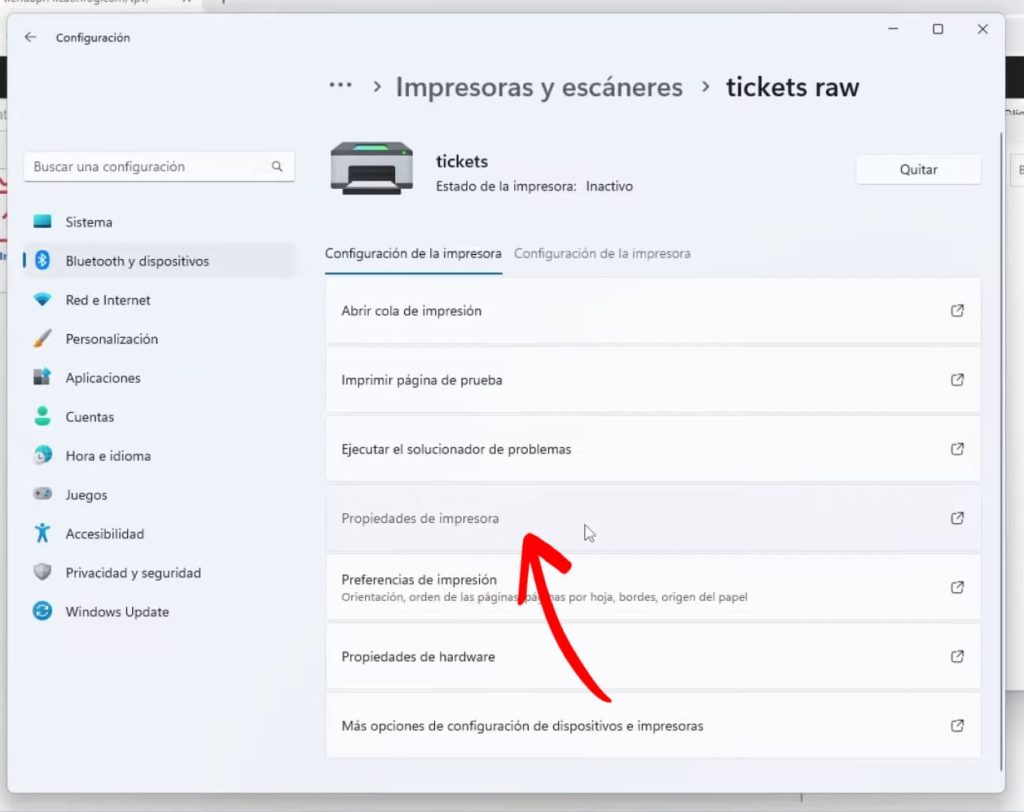
Go to the “Ports” tab.
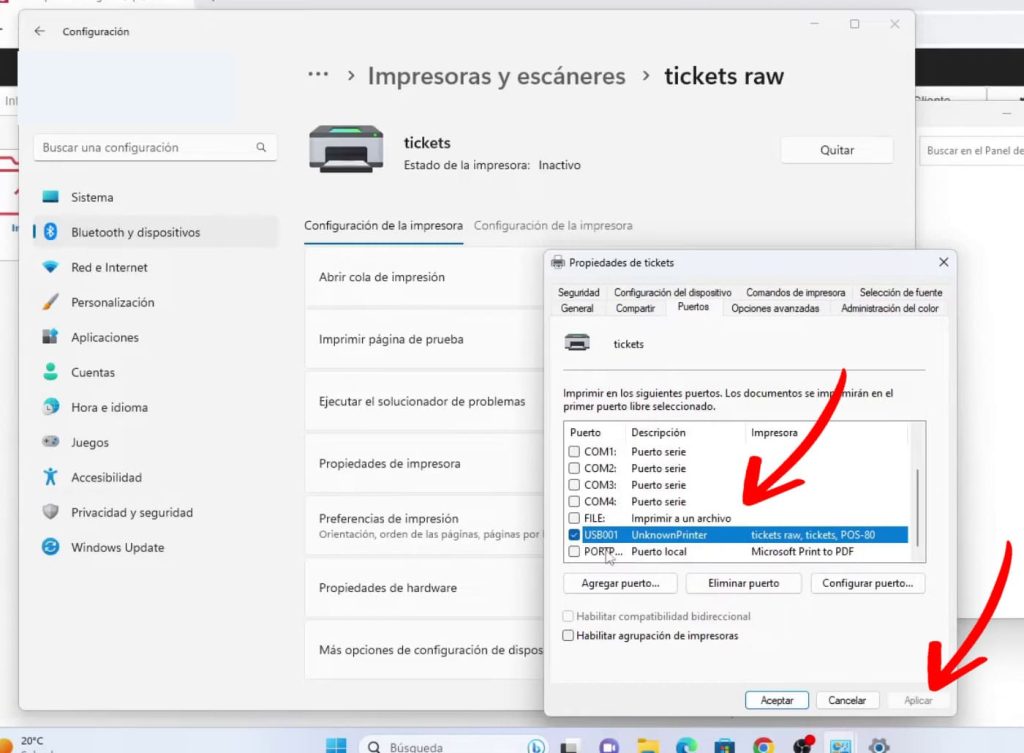
Select a different USB port and click Apply.
The receipt should print now. If it doesn’t, try selecting the next USB port and clicking Apply again. Wait a few seconds to see if it prints. Repeat this process for each USB port until it finally works or you’ve tried them all.
If it still doesn’t print, try the following:
- Make sure the printer is turned on.
- Check that the USB cable is firmly connected to both the computer and the printer.
- Finally, unplug and reconnect the USB cable.
- Turn the printer off and back on.
- Physically unplug the USB cable and try a different port. Wait a few seconds, and if it doesn’t print, keep switching through all available USB ports on the computer until it does.
Now go back to your computer, try switching the USB port for the printer again, and click Apply. Once you find the right port, the receipt will print.
Step 3: Select the Printer in Remero
You’re almost done—this last part is the easiest.
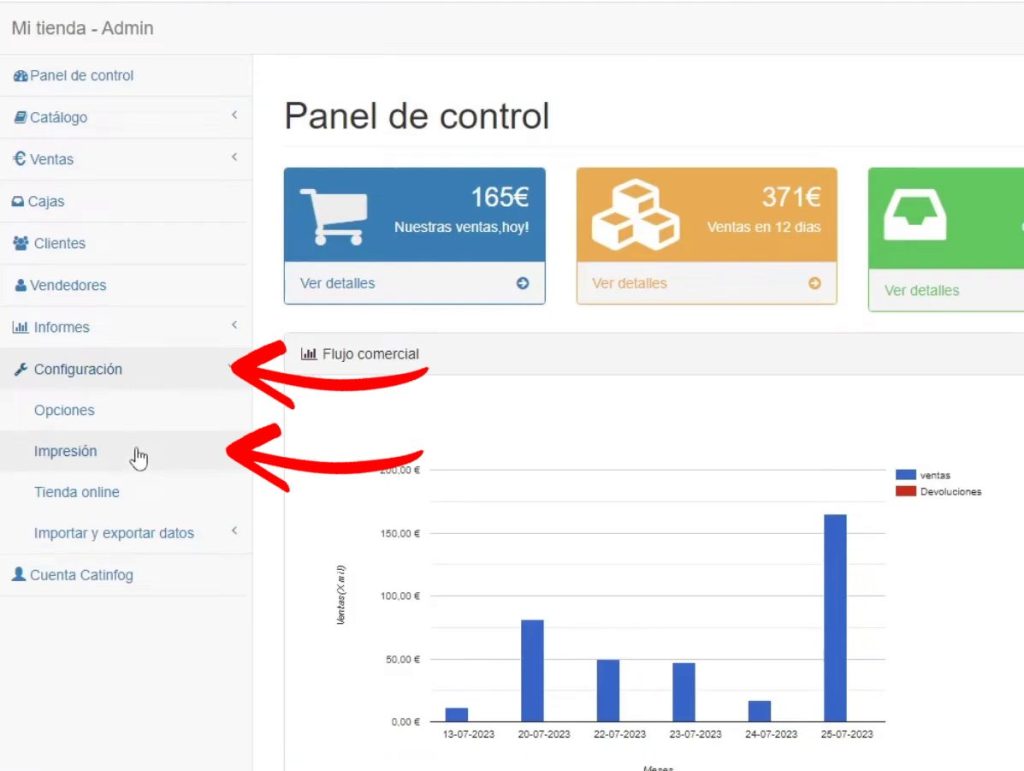
Log in to your Remero POS control panel.
Then go to Settings and open the Printing section.
Select the receipt printing method: either 58mm Raw or 80mm Raw, depending on the paper width your receipt printer uses (usually 80mm).
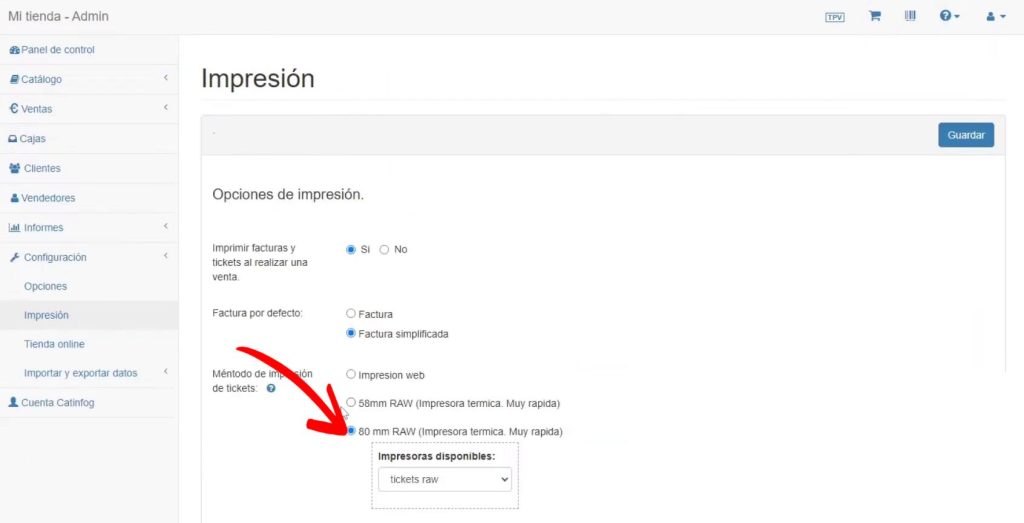
Select the receipt printer (in this tutorial we named it tickets raw) and click Save.
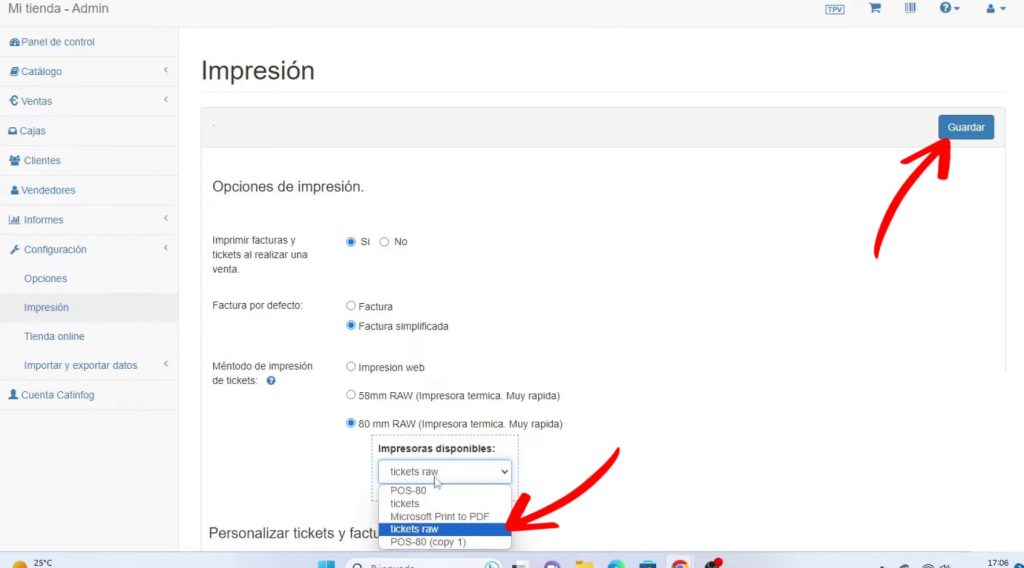
And voilà! Your receipt printer is now ready. It will automatically print every time you complete a sale, process a return, or close the register.
Installing the Receipt Printer on macOS (any version)
If you prefer watching a video instead of reading, here’s a step-by-step guide:
Step 1: Download and Install QZ on Your Mac
You’ll need to download and install QZ.
If you’re curious, QZ is the tool that sends the receipts to your receipt printer.
Download QZ for Mac Now
Step 2: Install the Receipt Printer on macOS
Trust me—I’ve installed hundreds of receipt printers from all brands on macOS. If you follow my steps, everything will work perfectly.
To get started, make sure your receipt printer is turned on and connected to your computer via USB.
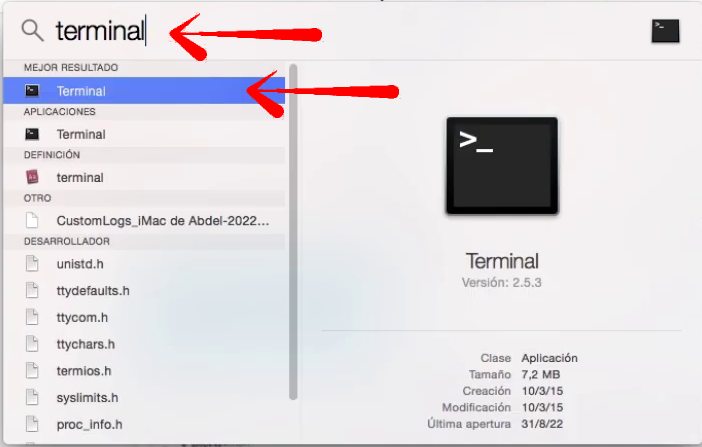
Now click on the magnifying glass icon (Spotlight).

Type “Terminal” and click on the Terminal app.
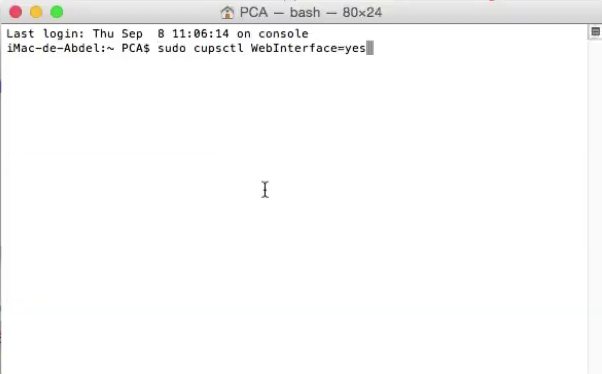
Type the following command into the terminal and press Enter:
sudo cupsctl WebInterface=yes
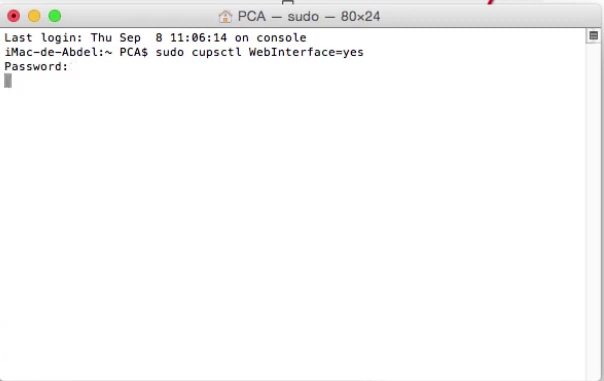
It will ask for your password. Type it and press Enter, even if nothing appears on the screen.
Now click the following link:
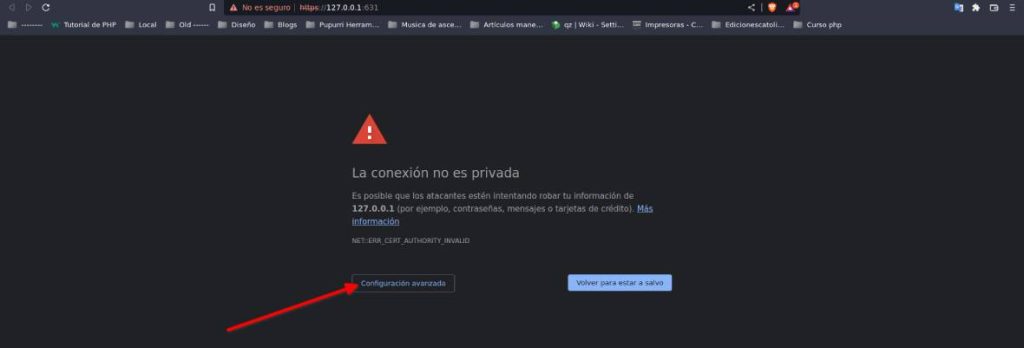
http://localhost:631/adminIf you see a security warning, click “Advanced” and then “Proceed”.
You’ll see a page asking for your Mac username and password. Enter your credentials and click “Log in”.

You should now see a screen like this:
If nothing appears or you get an error, use the following link instead. The process is exactly the same, but with a simpler (uglier) interface—it will still work just fine.
Click on “Add Printer”.
Now select the option “AppSocket/HP JetDirect” and click Continue.
You’ll see a screen like this:
Go back to the Terminal and type the following command, then press Enter:
lpinfo -v | grep usb
This should show something like the following:
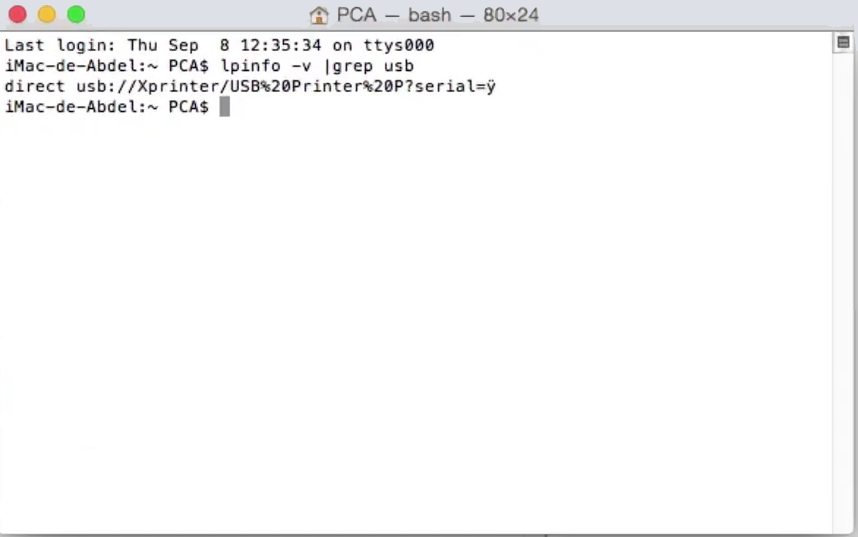
Important: If you don’t see anything, it means the printer isn’t properly connected or turned on. Make sure it’s connected and powered on, then run the command again:
lpinfo -v | grep usb
You’ll need to copy everything from “usb:” up to the question mark.
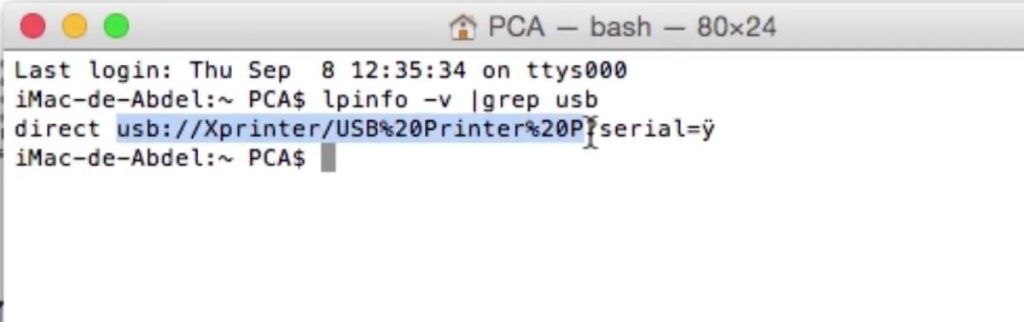
Now go back to the browser and paste that address there.
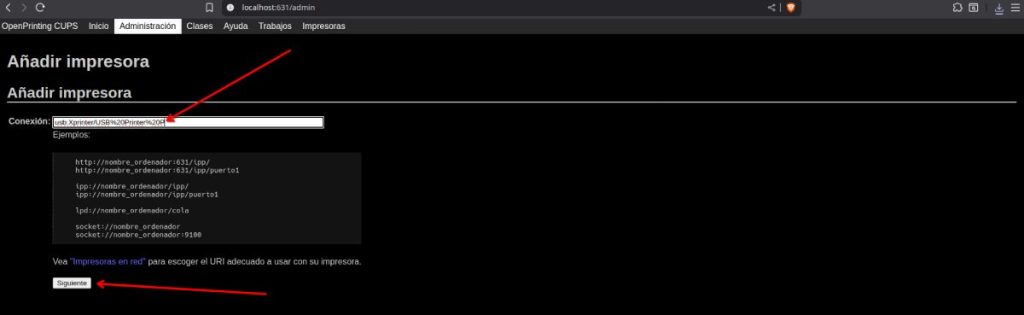
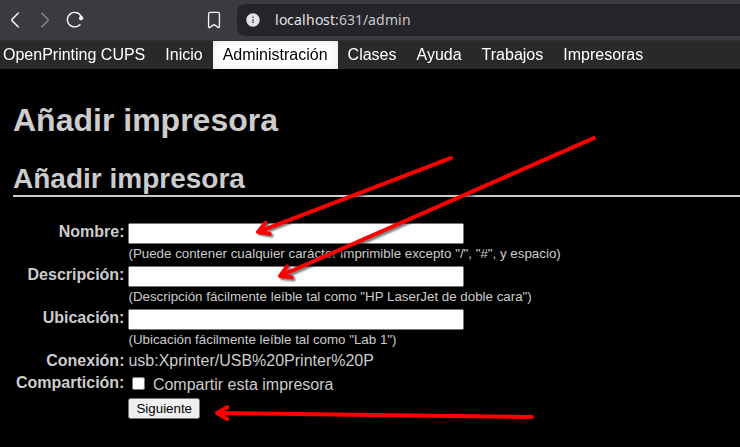
Now enter a name and a description (you can use the same for both), then click Continue.
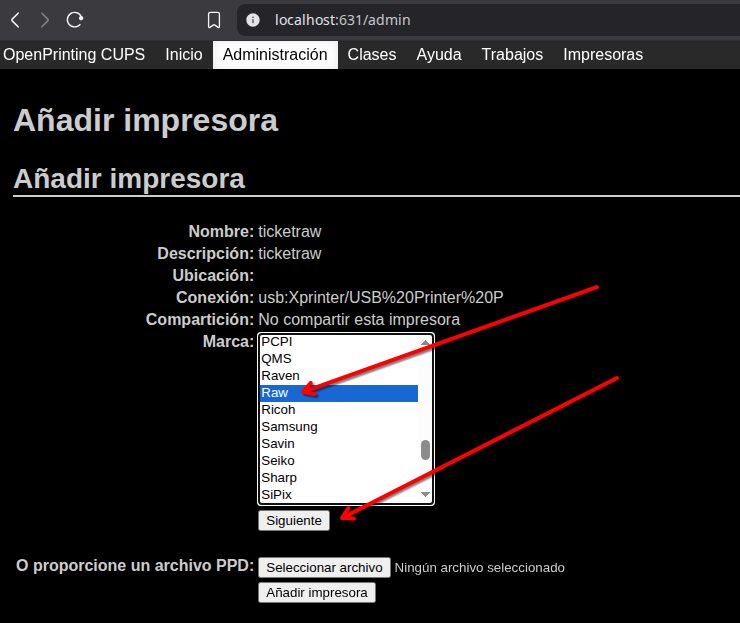
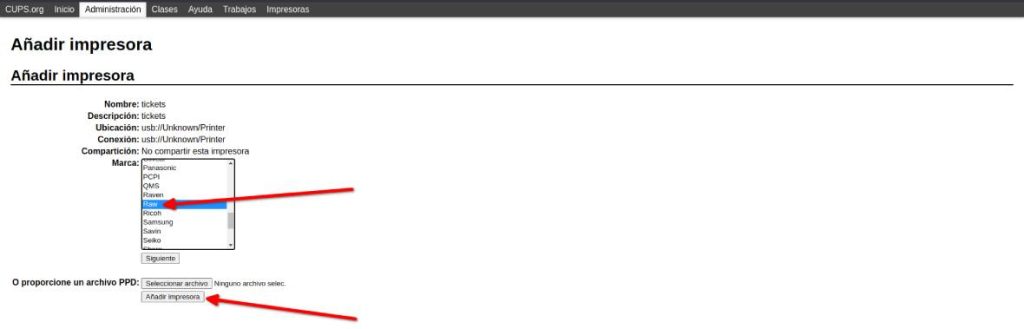
Next, find the brand Raw, click on it, and then click Continue.
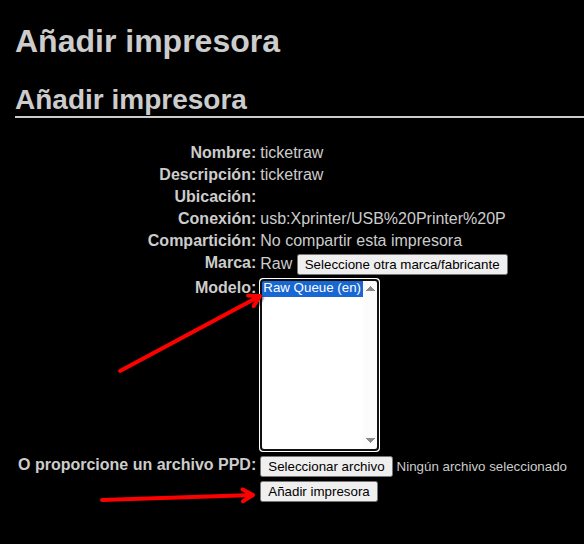
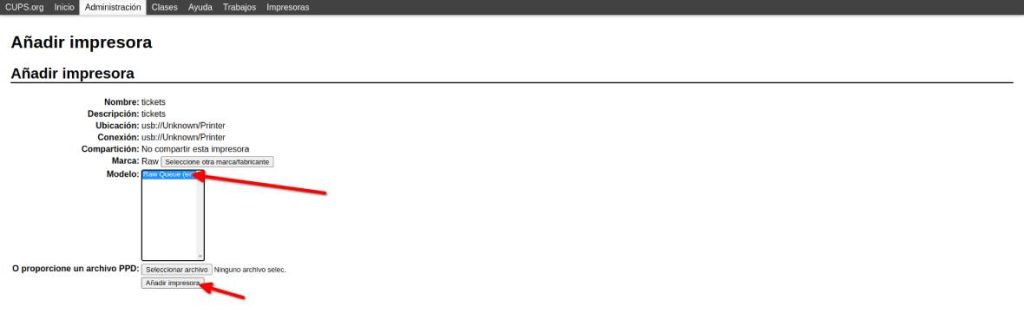
Click on Raw Queue and then on Add Printer.
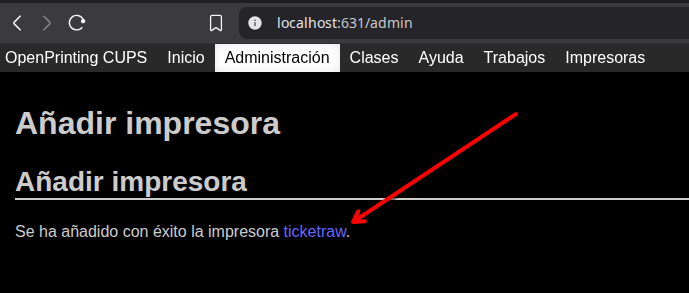
Done! The printer is now installed. Let’s test it and adjust one final setting. Click on the printer name.
Click on Maintenance, then select Print Test Page.
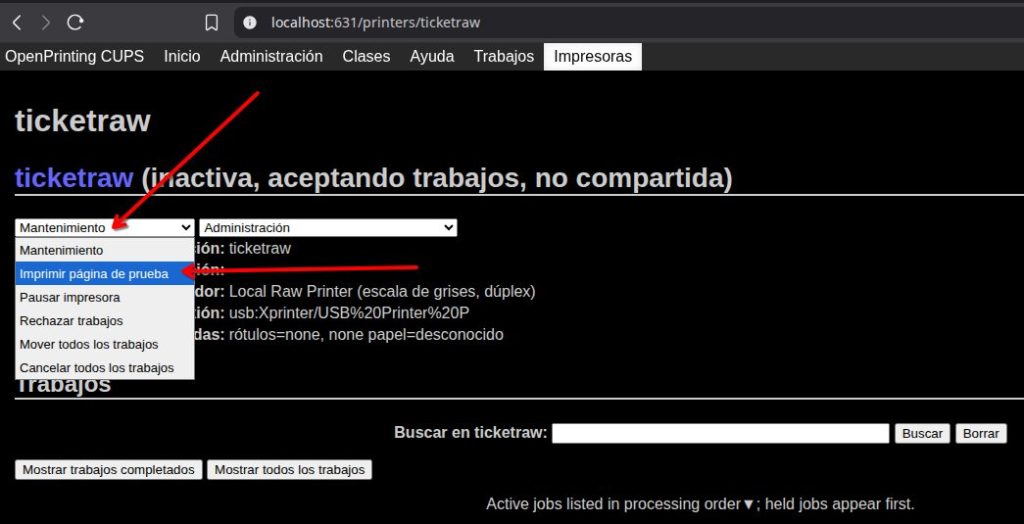
If everything worked, your printer will print a small test receipt.
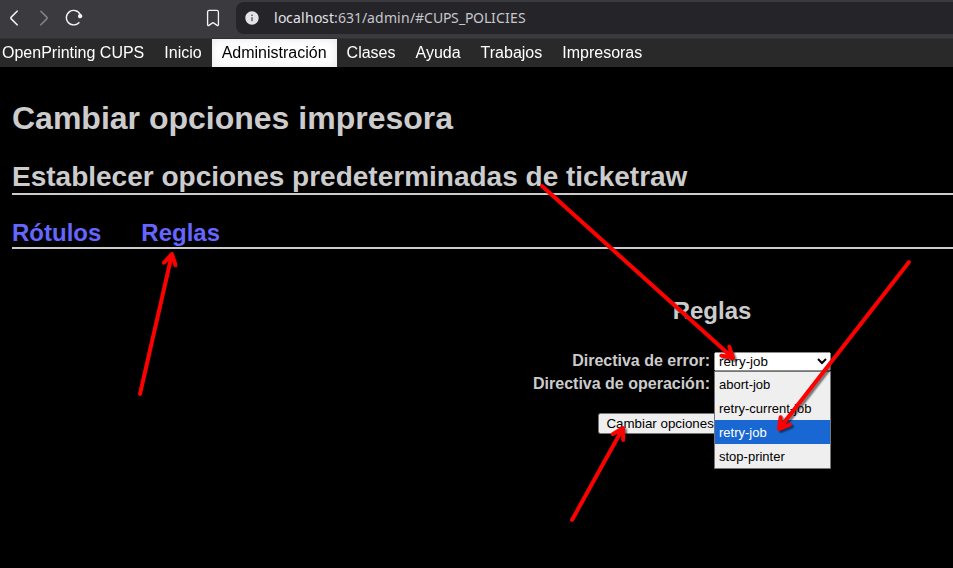
Now click on Administration and select Set Default Options.
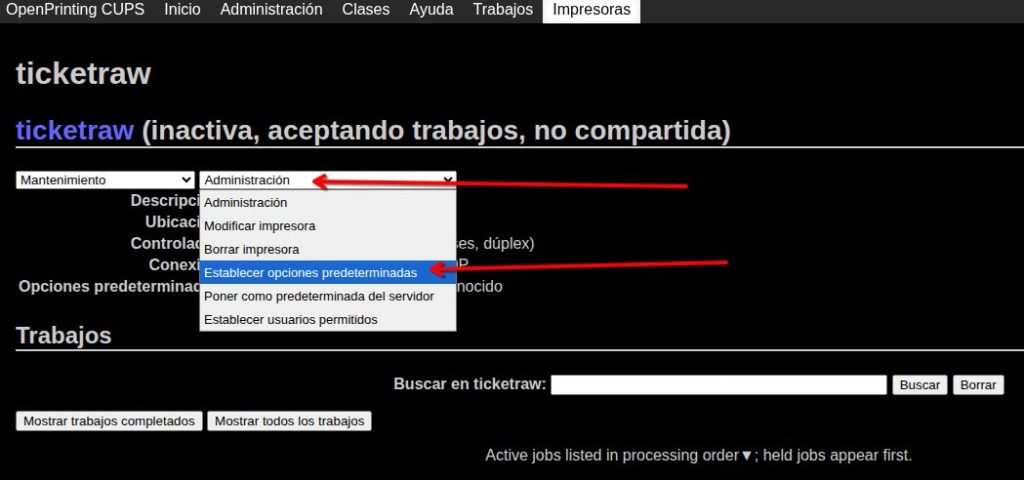
Click on Policies, choose Error Policy, set it to retry-job, and then click Change Settings.
Your receipt printer is now fully set up and ready to be used in your physical store. There’s nothing else to configure—feel free to close the tab.
Step 3: Select the Printer in Remero
You’re almost done—this last part is the easiest.
Log in to your Remero POS control panel.
Go to Settings and then to Printing.
Select the receipt printing method: either 58mm Raw or 80mm Raw, depending on the paper width your receipt printer uses (usually it’s 80mm).
Select the receipt printer (“tickets raw” as named in this tutorial) and click Save.
And that’s it! Your receipt printer is now ready. It will print perfectly every time you complete a sale, issue a refund, or close the register.
Install the Receipt Printer on Linux (any version)
If you prefer a video guide, follow this step-by-step tutorial:
Step 1: Download and Install QZ on Linux
You’ll need to download and install QZ.
If you’re curious, QZ is the program that sends the receipts to your receipt printer.
First, open a terminal and check if Java is installed:java -version
If Java is not installed, install it with:sudo apt install default-jre
Download QZ:wget https://github.com/zaqueoae/Catinfog/raw/refs/heads/master/qz.run
Make the file executable:chmod +x ./qz.run
Install QZ:sudo DEBUG=true ./qz.run
Delete the downloaded file:sudo rm qz.run
To uninstall QZ, run:sudo bash /opt/qz-tray/uninstall
Step 2: Install the Printer on Linux
Check if CUPS is installed:apt policy cups

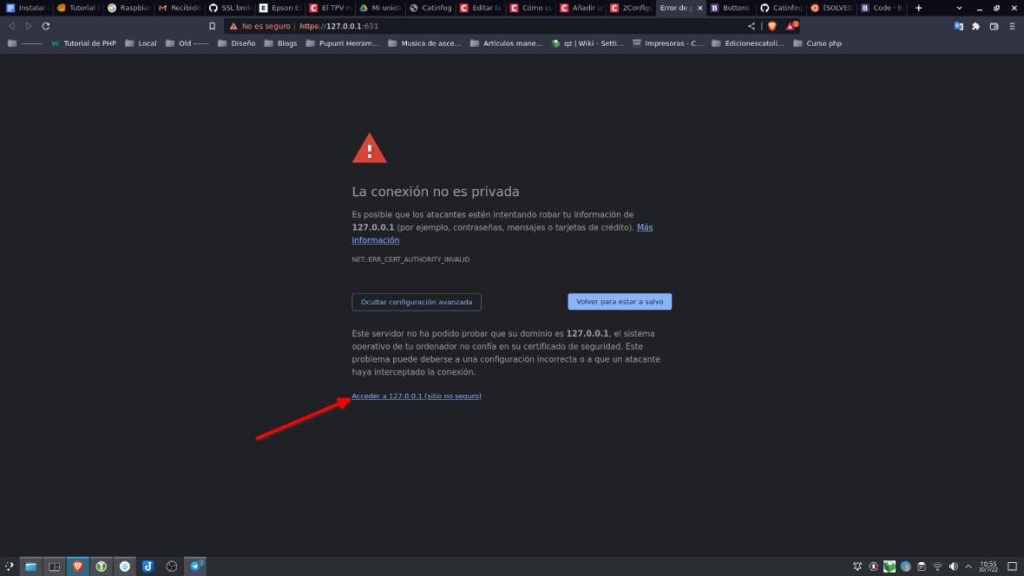
Open CUPS by visiting:
http://127.0.0.1:631/
If you see a security warning, click “Advanced” and then “Proceed”.
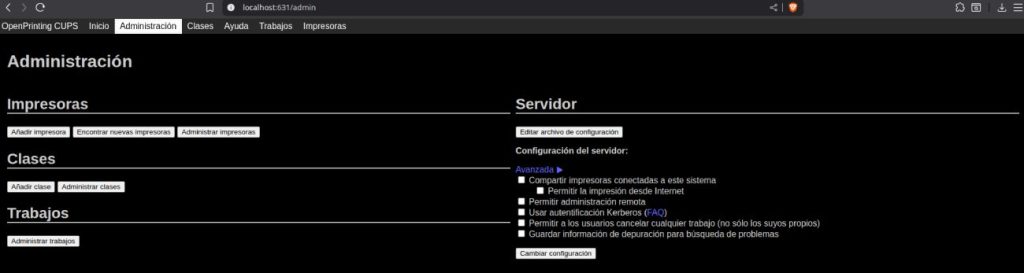
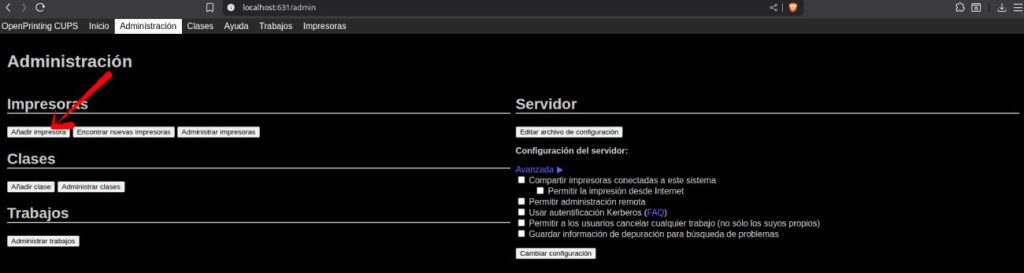
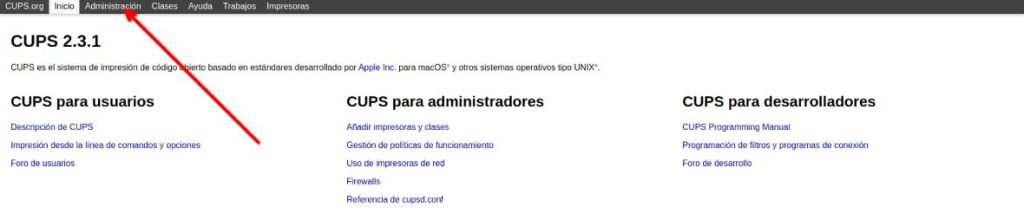
Click on Administration.
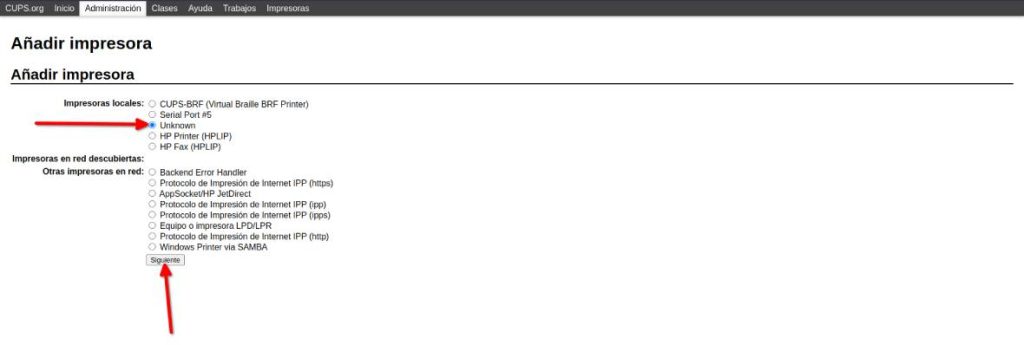
Click on Add Printer.

Enter your Linux username and password.
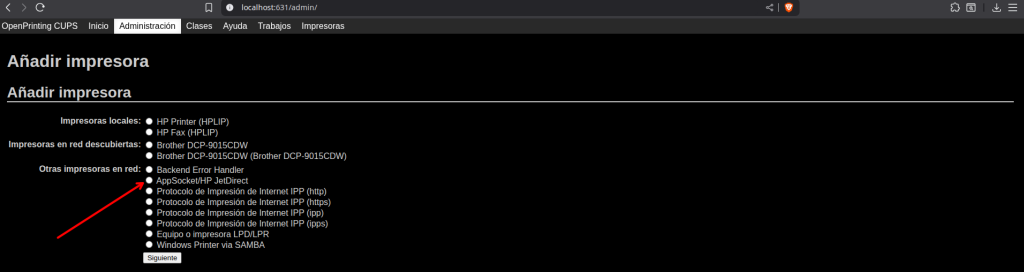
Now choose the option AppSocket/HP JetDirect and click Continue.
Note: If you don’t see the “unknown” device, it’s likely the printer is not connected, powered on, or there is an issue with the USB cable or port. Make sure everything is connected and try running:
lpinfo -v | grep usb
If nothing appears, try changing the USB port or cable.
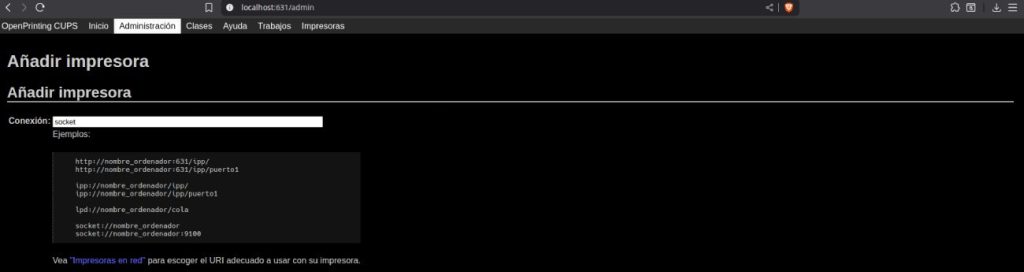
Enter a name and use the same name for the description.
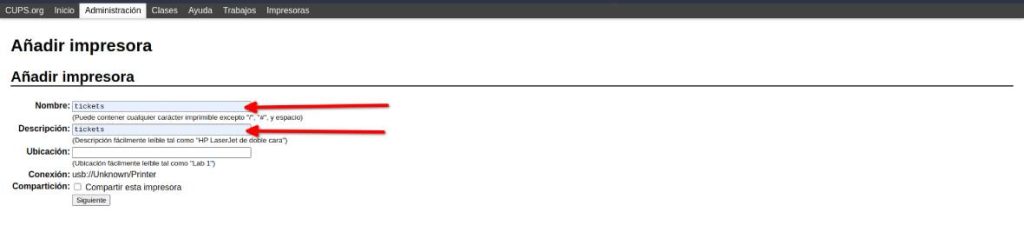
Select Raw and click Add Printer.
Select Raw Queue and click Add Printer again.
Done! Let’s test the printer and tweak a setting. Click on the printer’s name.
Click on Maintenance and then Print Test Page.
If everything went well, your printer should print a small test page.
Now click on Administration, then Set Default Options.
Click on Policies, then Error Policy, choose retry-job, and finally click Change Settings.
You’re all set! Now let’s test that everything is working.
Go to Printers and click on the installed printer.
Step 3: Select the Printer in Remero
You’re almost done—this last part is the easiest.
Log in to your Remero POS control panel.
Then go to Settings → Printing.
Select the ticket printing method as either 58mm Raw or 80mm Raw depending on your paper width (usually 80mm).
Select the receipt printer (we named it “tickets raw” in this tutorial) and click Save.
And just like that, your receipt printer is ready to go. It will now print perfectly every time you make a sale, issue a refund, or close your register.